Strand7 Interface: Spreadsheet
Description
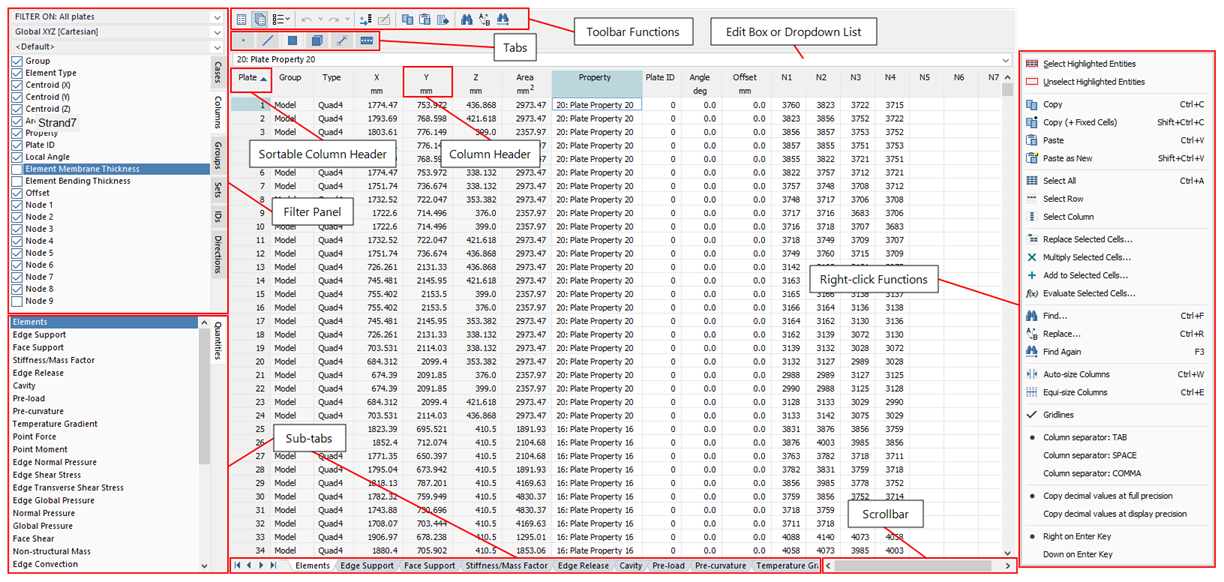
Some model data and information are displayed in tabular format or grid-based spreadsheets. Spreadsheets are essentially tables of data. Each table contains rows and columns (columns are also called fields). The intersection of a row and column is a cell.
Spreadsheets come in two categories: Editors and Viewers. Editors allow editing, whereas Viewers display read-only data. Some examples are:
Editors
- The TEXT Tab
- SUMMARY: Property Summary
- CASES: Combination Cases
- SOLVERS Load: Nonlinear Static
- LAYOUTS: Tables
- LAYOUTS: Paths
- CASES: Load Cases
- CASES: Freedom Cases
Viewers
Editors and Viewers share the same basic layout and design, but have different techniques for navigation, selection and editing.
Standard Spreadsheet Functions
Resizing Side Panel
Most spreadsheets are accompanied by a side panel on the left hand side. The width of the side panel can be adjusted by dragging the vertical splitter bar left or right.
Scrolling
A vertical scrollbar appears whenever there are too many rows to fit on the screen. Similarly, a horizontal scrollbar appears if there are too many columns or the columns are too wide. To see rows and columns that are not currently visible, use the appropriate scrollbar.
Tables usually have one or more fixed rows and columns. These are rows and columns that do not scroll when the scrollbar is used. Fixed rows typically contain headings. Fixed columns typically contain entity descriptions.
Column Sizing and Sorting
Columns are either text columns or numeric columns. Text data is always left justified whereas numeric data is always right justified. Numeric data is displayed according to the View Settings: Pre Numbers Tab (e.g., The TEXT Tab) and View Settings: Post Numbers Tab (e.g., The LISTINGS Tab).
To resize a column, move the mouse to a fixed row and drag horizontally the column divider on the right of the column.
A column can be auto-resized to fit all the data by double-clicking the column divider on the right of the column.
If a cell is too narrow to display its contents:
- Text is truncated to fit. An ellipsis ("...") is added to the text to indicate that not all the text is visible.
- Numbers are completely replaced by hashes ("#####"). This avoids the potential problem of misreading a number because not all of its digits are visible.
Rows cannot be resized.
In some spreadsheets, columns can be sorted. A sort arrow denotes the sort column. Clicking a column header sorts the table on the sort column; clicking the sorted column again reverses the sort order.
Text columns are sorted alphabetically, whilst numeric columns are sorted by value. Some spreadsheets also give the option of sorting numbers based on the actual value or the absolute value (see The LISTINGS Tab).
Multiple Pages
In some cases, a spreadsheet is made up of multiple pages (pages are also referred to as sheets or tabs). Multiple pages are accessed by a set of tabs at the top of the spreadsheet (e.g., node tab, plate tab). Clicking a tab changes the current page.
Where there are a large number of pages, an additional set of sub-tabs appears at the bottom of the spreadsheet. There is a sub-tab set for each sheet. When sub-tabs are used, they share space at the bottom of the spreadsheet with the horizontal scrollbar. To change the relative size of the sub-tabs to the horizontal scrollbar, drag the resize grip that lies between the tabs and the scrollbar.
The sub-tabs are also available as list entries on the lower pane of the side panel.
Navigating
The scrollbars, together with a range of keys, can be used to navigate about spreadsheets.
The following table indicates the available navigation actions in Editor spreadsheets.
|
Action |
Moves the focus cell... |
|
Left mouse click |
To clicked cell. |
|
Up arrow |
Up one row. |
|
Down arrow |
Down one row. |
|
Left arrow |
Left one column. |
|
Right arrow |
Right one column. |
|
Tab |
To the next available cell. |
|
Shift+Tab |
To the previous available cell. |
|
Home |
To the far left column. |
|
End |
To the far right column. |
|
Page Up |
Up by the number of visible rows. |
|
Page Down |
Down by the number of visible rows. |
|
Ctrl+Home |
To the top row (far left column). |
|
Ctrl+End |
To the bottom row. |
|
Enter |
Down one row OR right one column (user-defined option). |
The following table indicates the available navigation actions in Viewer spreadsheets.
|
Action |
Moves the visible cell... |
|
Left mouse click |
To clicked cell. |
|
Up arrow |
Up one row. |
|
Down arrow |
Down one row. |
|
Left arrow |
Left one column. |
|
Right arrow |
Right one column. |
|
Home |
To the top row. |
|
End |
To the bottom row. |
|
Page Up |
Up by the number of visible rows. |
|
Page Down |
Down by the number of visible rows. |
Editing Cells
While the Viewer spreadsheets provide read-only access to data, the Editor spreadsheets allow data to be directly edited and manipulated.
Editors can be identified by either of the following:
- A focus cell surrounded by a thick outline that receives keystroke input.
- An edit bar or combo bar above the table, that shows the contents of the focus cell.
Cells come in two main varieties:
Fixed cells
Cells in the fixed rows and columns. They cannot be edited, selected or focused.
Data cells
All other cells. They can be focused and selected, and sometimes edited.
There are five main types of data cell:
-
Text cells

These cells are surrounded be a thick outline when they are the focused cell. A text cell can be edited by typing directly into the cell, or into the edit bar above the table. The edit bar allows you to see long text strings that are truncated in the focus cell.
Text cells can contain a range of data types including strings, real numbers and integers.
Certain cells such as Staged Property Switch can be edited by typing "-1" or "<i" to set as <Inherited>.
A drag hot-spot at the bottom right hand corner of the cell is available to copy the value across to other cells by dragging. Double-clicking the drag hot-spot copies the value vertically to all cells below until the borderline to the next section.
-
Combo cells

These cells are similar in appearance to text cells, but unlike text cells, they only have a fixed number of possible values. You can edit a combo cell by typing one of the allowable values into the cell (or enough text to uniquely identify a value). You can also select a new value by using the combo bar above the table. The combo bar allows you to choose from the available values for the cell. For example, the Taper Type field in the beam taper attribute page of the The TEXT Tab is a combo cell field because you select only from the list of available taper types: Top, Sym or Bot. You can also cycle between items in the list by pressing the space bar or by double-clicking the cell.
A drag hot-spot at the bottom right hand corner of the cell is available to copy the value across to other cells by dragging. Double-clicking the drag hot-spot copies the value vertically to all cells below until the borderline to the next section.
-
Check cells

A special type of combo cell is the check cell. These have two states: either empty cells or contain a checkmark. These cells are used to denote Yes/No states. An example is the Envelope Case Combination Editor, which allows the selection of various cases for envelope creation. You can switch between the checked/unchecked states by pressing the space bar or by double-clicking the cell.
A drag hot-spot at the bottom right hand corner of the cell is available to copy the value across to other cells by dragging. Double-clicking the drag hot-spot copies the value vertically to all cells below until the borderline to the next section.
-
Colour cells

These cells are surrounded by a thick outline when they are the focused cell. You can edit a colour cell by double-clicking the cell to open the Colour Selection dialog, then choosing or defining a new colour. Alternatively, a colour value can be entered directly as a 32-bit integer that encodes RGB (red-green-blue) values of the colour using the following formula:

where Red, Green and Blue values range from 0 to 255. For example, an RGB colour defined by Red = 33, Green = 165 and Blue = 239 has a colour number of 15705377.
Syntax "R:", "G:", and "B:" can also be used to enter RGB components directly to define a colour. For example, entering "B:255 R:255" in any order produces magenta of colour number 16711935
A drag hot-spot at the bottom right hand corner is available to copy the value across to other cells by dragging. Double-clicking the drag hot-spot copies the value vertically to all cells below until the borderline to the next section.
-
Read-only cells

These are surrounded by a thin grey outline. They can be selected but not edited. Read-only cells typically display information that is calculated by Strand7 based on values you have entered. For example, the Element Volume field in the The TEXT Tab is read-only because it is based on the connections you have specified.
Drag-Copying Cells
You can drag copy text from a cell vertically or horizontally into nearby cells.
To drag copy a cell, place your mouse over the drag hot-spot (black square) at bottom right hand corner of the focused cell. This changes your mouse pointer into a cross-hairs. Drag vertically or horizontally as many cells as you want to copy to.
Dragging past the right edge or bottom edge allows you to dynamically extend the drag copy in these directions. Dragging past the top row or left column allows you to dynamically extend the drag copy in these directions.
You can change a drag copy from vertical to horizontal, or vice versa, before releasing the mouse.
Double-clicking the drag hot-spot copies the value vertically to all cells below until the borderline to the next section.
Editing Text Cells
Text cells can be edited directly by typing over the existing contents. The new contents are posted to Strand7 when you hit the Enter key or move to a different cell.
Data validation occurs when data is posted. For example, a numeric field may have a certain range of allowable values. Data reformatting also occurs at the same time. For example, numeric data is redisplayed using the current Strand7 global options for decimal places, scientific notation and so on.
If the new text cannot be interpreted, or is invalid, the previous value is reinstated. For example, you may accidentally type some alphabetic characters into a numeric field, or you may clear the contents of a field that requires a non-blank string. In both cases, the previous value is re-used.
You can undo a change before it has been posted by pressing the Escape key.
To edit the current text on a character-by-character basis (rather than simply typing over it) double-click the cell or press the F2 key.
To quickly clear a cell, press the Backspace key.
To copy-and-paste from one cell to another, click the source cell and select Copy to clipboard (Ctrl+C). Click the destination cell and select Paste from clipboard (Ctrl+V).
All cells have a default value. To set a cell to its default value, press the Delete key. The default value depends upon the nature of the field. Many numeric fields use 0.0 as the default value.
When you focus on a text cell, you can also type into the edit bar above the table. An edit bar is provided so you can view and edit long strings that would otherwise be truncated.
Editing Combo Cells
Combo cells are similar to text cells, except there is a fixed list of allowable cell values.
When you focus on a combo cell, a Combo Bar appears above the table. A combo bar is provided so you can view, and select from, the available options for that cell. Selecting a new value in the combo bar sets the cell to that value.
Double-clicking a combo cell, or pressing the Space bar, sets it to the next available value (cycling through at the end of the list). This is particularly useful for cells that have a small number of available values (such as Check Cells, which have only Yes and No).
You can also edit combo cells by typing in directly. As there are a limited number of allowable values, you must type in at least enough text to uniquely identify the entry you want. Entries are not case sensitive.
For example, suppose the allowable values are Pier, Headstock, Bridge and Bearing:
- To select Pier, type "p", "pi", "pie" or "pier".
- To select Bridge, type "br" or more letters. You cannot just type "b", because this cannot be distinguished from Bearing.
- To select Bearing, type at least "be".
Use the Escape key to undo a change before it is posted. Use the F2 key to edit the current text on a character-by-character basis. Use the Backspace key to quickly clear a cell. When you type into a combo cell, the new contents are posted to Strand7 when you hit the Enter key or move to a different cell.
To copy-and-paste from one cell to another, click the source cell and select Copy to clipboard (Ctrl+C). Click the destination cell and select Paste from clipboard (Ctrl+V).
Occasionally, a combo option is surrounded by square brackets. This denotes an option where the displayed text is not the same as the text in the list. In this case, either the text in the list or the text as displayed can be typed. For example, when editing node freedoms in The TEXT Tab, there are the following options: [Free], [Fully fixed] and [Prescribed displacement]. Selecting [Free] clears the cell. Selecting [Fully fixed] sets the cell to DX, DY, DZ, RX, RY or RZ, depending on the degree of freedom being set. Selecting [Prescribed displacement] sets the cell to 0.0.
Selecting Cells
Cells can be selected for copying and pasting data between applications. Editors allow data to be copied and pasted; Viewers allow copying only.
Editors always have at least one cell selected (the focus cell). Viewers may have none, one or many cells selected. In all cases, multiple selected cells must form a rectangular region. Disconnected cells cannot be selected. Selected cells, except the focus cell on an Editor, use reversed a text colour on a coloured background .
The simplest way to select cells is to hold down the left mouse button and drag diagonally in any direction. Dragging past the right edge or bottom edge allows for the selection region to be dynamically extended in these directions. Dragging past the top row or left column allows for the selection region to be dynamically extended in these directions.
Fixed cells cannot be selected using the mouse or Ctrl+C. To select and copy fixed cells, use Ctrl+Shift+C Copy with Fixed Cells).
The following table indicates the available selection actions in Editor spreadsheets. A selection anchor cell is the cell over which the mouse was released during the generation of the selection region.
|
Action |
Moves the focus cell... |
|
Left mouse click |
To clicked cell, and clears selection. |
|
Left mouse click+drag |
To clicked cell, and selects cells between clicked cell and released cell. |
|
Shift+Left mouse click |
Does not move focus cell. Selects cells between focus cell and clicked cell. |
|
Shift+Up arrow |
Up one row. Selects cells between focus cell and anchor cell. |
|
Shift+Down arrow |
Down one row. Selects cells between focus cell and anchor cell. |
|
Shift+Left arrow |
Left one column. Selects cells between focus cell and anchor cell. |
|
Shift+Right arrow |
Right one column. Selects cells between focus cell and anchor cell. |
|
Shift+Home |
To far left column. Selects cells between focus cell and anchor cell. |
|
Shift+End |
To far right column. Selects cells between focus cell and anchor cell. |
|
Shift+Page Up |
Up by the number of visible rows. Selects cells between focus cell and anchor cell. |
|
Shift+Page Down |
Down by the number of visible rows. Selects cells between focus cell and anchor cell. |
|
Shift+Ctrl+Home |
To the top row (far left column). Selects cells between focus cell and anchor cell. |
|
Shift+Ctrl+End |
To the bottom row (far right column). Selects cells between focus cell and anchor cell. |
The following table indicates the available selection actions in Viewer spreadsheets at all times.
|
Action |
Adjusts the selection region by... |
|
Left mouse click |
Clears selection. |
|
Left mouse click+drag |
Selects cells between clicked cell and released cell. |
The following table indicates the available selection actions in Viewer spreadsheets if some cells are already selected.
|
Action |
Adjusts the selection region by... |
|
Shift+mouse click |
Selects cells between anchor cell and clicked cell. |
|
Shift+Home |
Selects cells between anchor cell and top left cell. |
|
Shift+End |
Selects cells between anchor cell and bottom right cell. |
|
Shift+Page Up |
Extends selection upwards by number of visible rows. |
|
Shift+Page Down |
Extends selection downwards by number of visible rows. |
Copying and Pasting Text
Copying to the Windows clipboard
Once a selection has been made, it can be copied to the Windows clipboard by selecting Copy (Ctrl+C) or Copy (+Fixed Cells) (Ctrl+Shift+C). This text can then be pasted into other Windows applications, such as Microsoft Word or Microsoft Excel. When the selection is written to the clipboard, the selection of either Tab Space or Comma as the separator between cells, is made via the right-click option.
Pasting from the clipboard
Text can be pasted from the Windows clipboard into an Editor spreadsheet by selecting Paste (Ctrl+V). Strand7 reads the clipboard text in search of tokens (a token is a text string surrounded by at least one blank space, comma or tab character depending on the Tab/Space/Comma column separator setting).
By default, the tab character is used as the column separator as this is the most common case. But it is important to set the right one in the Strand7 spreadsheet before pasting data.
Starting with the focus cell, tokens are pasted cell-by-cell as they are found. If a carriage return character is encountered, pasting continues on the next row, starting at the same column as the focus cell. Pasting continues in this manner until the entire clipboard has been read.
Any clipboard data that falls past the last column or row is either ignored or automatically adds new rows, depending on the spreadsheet type. For example, in the The TEXT Tab, rows past the last row are ignored whilst in the LAYOUTS: Tables, new rows are added.
Finding and Replacing Text
Text can be searched and replaced in Editor spreadsheets but not in Viewer spreadsheets.
See TEXT: Find and TEXT: Replace.
Right-click Functions
Right-clicking in the spreadsheet area opens a popup menu of options to customise and interact with the data.
See Strand7 Interface: Right-click Functions.
See Also